Whirled SDK/Classpaths
Jump to navigation
Jump to search
Setting Up Your Classpaths
Setting a classpath will allow a program to automatically import the code needed for all your future avatars, pets, toys, or furniture items. When correctly set up, all your creations requiring use of the Whirled SDK will export with the code while using that program!
Adobe Flash CS3
- In Flash CS3, choose Edit -> Preferences or use Ctrl-u.
- Under Category, choose ActionScript.
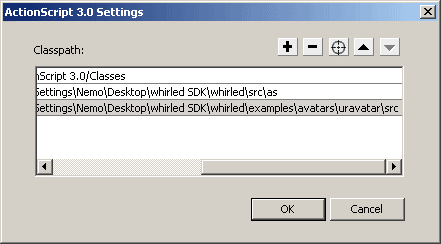
- Click the button labeled "ActionScript 3.0 Settings...".
- Add the base Whirled classpath:
- Click the plus to add a new classpath.
- Click the crosshairs to browse to your SDK folders.
- Find and set the path to "...\whirled\src\as".
- Add the contrib directory if you want to use items there:
- Click the plus to add a new classpath.
- Click the crosshairs to browse to your SDK folders.
- Find and set the path to "...\whirled\contrib\src\as".
- Add the avatar or pet classpath:
- Click the plus to add a new classpath.
- Click the crosshairs to browse to your SDK folders.
- Find and set the path to "...\whirled\examples\avatars\uravatar\src" or "...\whirled\examples\avatars\urpet\src"
- Note: some bases and avatars may require additional classpaths. Check with the base creator for the location of any additional classpaths.
<noinclude></noinclude>
Adobe Flash CS4 / Adobe Flash CS5
- In Flash CS4, choose Edit -> Preferences or use Ctrl-u.
- Choose the Actionscript option from the side panel.
- Click the button labeled "ActionScript 3.0 Settings...".
- Add the base Whirled classpath:
- Click the plus to add a new classpath.
- Click the yellow folder to browse to your SDK folders.
- Find and set the path to "...\whirled\src\as".
- Add the contrib directory if you want to use items there:
- Click the plus to add a new classpath.
- Click the yellow folder to browse to your SDK folders.
- Find and set the path to "...\whirled\contrib\src\as".
- Add the avatar or pet classpath:
- Click the plus to add a new classpath.
- Click the yellow folder to browse to your SDK folders.
- Find and set the path to "...\whirled\examples\avatars\uravatar\src" or "...\whirled\examples\avatars\urpet\src"
- Duplicate these classpaths in the section labelled External Library Path
- Note: some bases and avatars may require additional classpaths. Check with the base creator for the location of any additional classpaths.
<noinclude></noinclude>

